Table of Contents
Add MQTT to communicate between multiple nodes and a central controller
Now we need to update the sketch that runs on the TerraControl node to sent out the JSON object thru MQTT instead of the serial port.
Arduino code
main.cpp
#include "Ticker.h"               // Library for scheduling tasks without using delay()

#include <WIFI_helper.h>
#include <MQTT_helper.h>
#include <ArduinoJson.h>          // Needed to store configuration as JSON: https://github.com/bblanchon/ArduinoJson
#include <Sensirion_SHT1x.h>      // Declarations for the Sensirion SHT11 Temperature/Humidity sensor
#include <DS18B20_Sensors.h>      // Declarations for the Sensirion DS18B20 Temperature sensor

void getMeasurements();
Ticker timerMeasurement(getMeasurements, 5000); // execute getMeasurements() every 5000ms

void setup()
{
  Serial.begin(74880);

  // Print the Node identifier
  Serial.print("ESP Board MAC Address:  ");
  Serial.println(WiFi.macAddress());

  setup_wifi();
  setup_MQTT();

  // Start up the DS18B20 library
  DS18B20.begin();

  // Find available DS18B20 sensors
  report_DS18B20_sensors();

  // Set the temperature resolution for each DS18B20 sensor
  for (int i=0; i<deviceCount; i++){
    DS18B20.setResolution(T[i].addr, TEMPERATURE_PRECISION_10_BIT);
    print_DS18B20_resolution(T[i].addr);
  }

  // start the timer for periodic measurements
  timerMeasurement.start();
}

void loop()
{
  // check to see if the timer has elapsed
  timerMeasurement.update();
}

void getMeasurements(){
  // create a JSON object
  const int capacity = JSON_OBJECT_SIZE(1024);
  StaticJsonDocument<capacity> obj;

  // add the node identifier to the JSON object
  obj["node"] = WiFi.macAddress();

  // request a measurement form each DS18B20 sensor
  Serial.println("Requesting temperatures...");
  DS18B20.requestTemperatures();

  // add the measured temperatures to the JSON object
  for (int i=0; i<deviceCount; i++){
    obj["measurements"]["temperature"][i]["type"] = "DS18B20";
    obj["measurements"]["temperature"][i]["id"] = i;
    obj["measurements"]["temperature"][i]["value"] = round(DS18B20.getTempCByIndex(i)*10) / 10;
  }

  // Read values from the SHT11 sensor
  temp_c = sht1x.readTemperatureC();
  temp_f = sht1x.readTemperatureF();
  humidity = sht1x.readHumidity();

  // add the SHT11 temperature values to the JSON object
  obj["measurements"]["temperature"][deviceCount]["type"] = "SHT11";
  obj["measurements"]["temperature"][deviceCount]["value"] = round(temp_c*10)/10;

  // add the SHT11 humidity values to the JSON object
  obj["measurements"]["humidity"][0]["type"] = "SHT11";
  obj["measurements"]["humidity"][0]["value"] = round(humidity);

  // print the JSON object to the serial port
  //serializeJsonPretty(obj, Serial);

  if (!client.connected()) {
		reconnect();
	}
	client.loop();

  serializeJson(obj, msg, 1024);

	client.publish("outTopic",msg );

  Serial.println("");
  Serial.println("DONE");
}
WIFI_helper.h
Don’t forget to alter the ssid and password to your own settings!!!
#include <ESP8266WiFi.h>
const char* ssid = "MyFantasticWifi";
const char* password = "correcthorsebatterystaple";

WiFiClient espClient;

void setup_wifi() {

  delay(10);
  // We start by connecting to a WiFi network
  Serial.println();
  Serial.print("Connecting to ");
  Serial.println(ssid);

  WiFi.mode(WIFI_STA);
  WiFi.begin(ssid, password);

  while (WiFi.status() != WL_CONNECTED) {
    delay(500);
    Serial.print(".");
  }

  randomSeed(micros());

  Serial.println("");
  Serial.println("WiFi connected");
  Serial.println("IP address: ");
  Serial.println(WiFi.localIP());
}
MQTT_helper.h
Don’t forget to alter the mqtt_server to the IP address of the MQTT broker (Raspberry Pi).
#include <PubSubClient.h>
const char* mqtt_server = "192.168.1.1";

PubSubClient client(espClient);
unsigned long lastMsg = 0;
#define MSG_BUFFER_SIZE	(1024)
char msg[MSG_BUFFER_SIZE];

void callback(char* topic, byte* payload, int length) {
  Serial.print("Message arrived [");
  Serial.print(topic);
  Serial.print("] ");
}

void reconnect() {
  // Loop until we're reconnected
  while (!client.connected()) {
    Serial.print("Attempting MQTT connection...");
    // Create a random client ID
    String clientId = WiFi.macAddress();
    // Attempt to connect
    if (client.connect(clientId.c_str())) {
      Serial.println("connected");
    } else {
      Serial.print("failed, rc=");
      Serial.print(client.state());
      Serial.println(" try again in 5 seconds");
      // Wait 5 seconds before retrying
      delay(5000);
    }
  }
}

void setup_MQTT(){
	client.setServer(mqtt_server, 1883);
  client.setBufferSize(1024);
  client.setCallback(callback);
}
To see if it works I use MQTT.fx on my PC
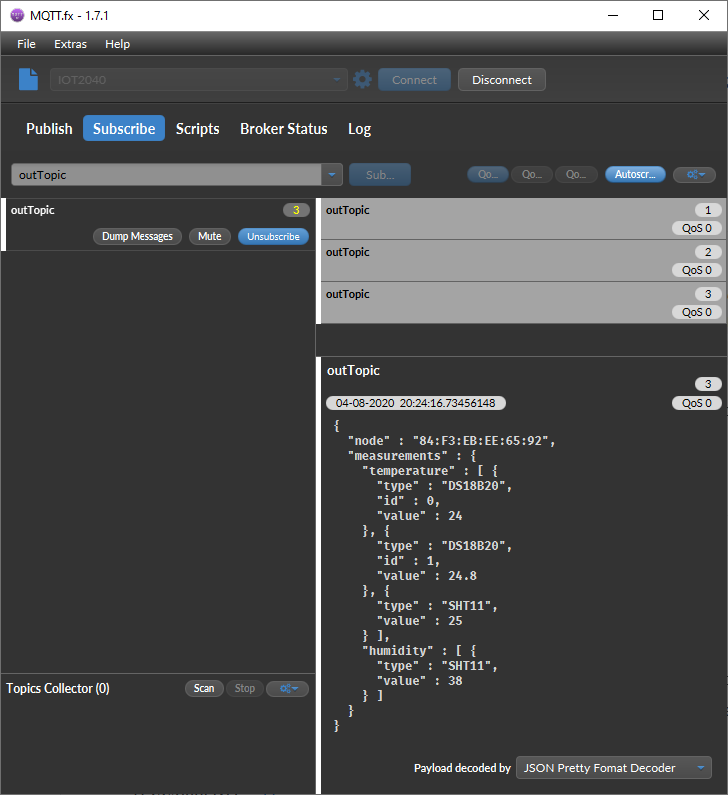
With the data flowing in we can try to visualize it in Node-Red.