Table of Contents
My son got a ELECFREAKS Joystick:bit for X-mas and he wanted to use it to control his Scratch games on the PC.

With the Scratch 3 micro:bit bluetooth link it isn’t possible to send/receive analog values so we decided to make it function as a keyboard. We hooked up an Arduino due to the PC and used the Arduino keyboard en mouse functions to control Scratch.
Bluetooth communication between Arduino and Micro:bit
To sent the data from the Micro:bit to the Arduino due we wanted to use Bluetooth as it is incorporated into the Micro:bit and I have an BT breakout board for my Arduino due.
Unfortunately I couldn’t get Bluetooth communication to work between my BT breakout board and the Micro:bit, even though it worked nicely between Micro:bit and my phone using the Bluefruit app from Lady Ada.
Serial communication between Arduino and Micro:bit
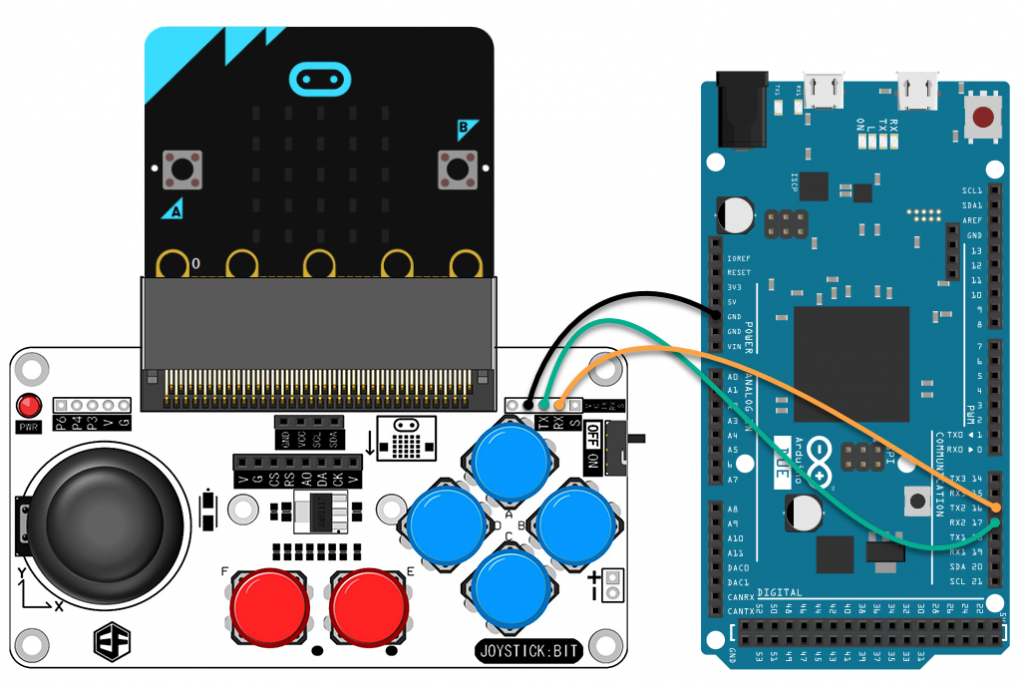
As Bluetooth didn’t work for us I convinced my son to use serial communication between the Micro:bit and the Arduino due. Fortunately they are both 3V devices so we didn’t need any voltage dividers.
Micro:bit coding
The coding on the Micro:bit is pretty strait forward as ELECFREAKS already have a nice example on how to read the buttons, pity they didn’t add the joystick button (or did I just miss it?). All my son had to do is output the pressed button ID’s through serial. We also added the current analog values for the two joystick potmeters to the serial output.
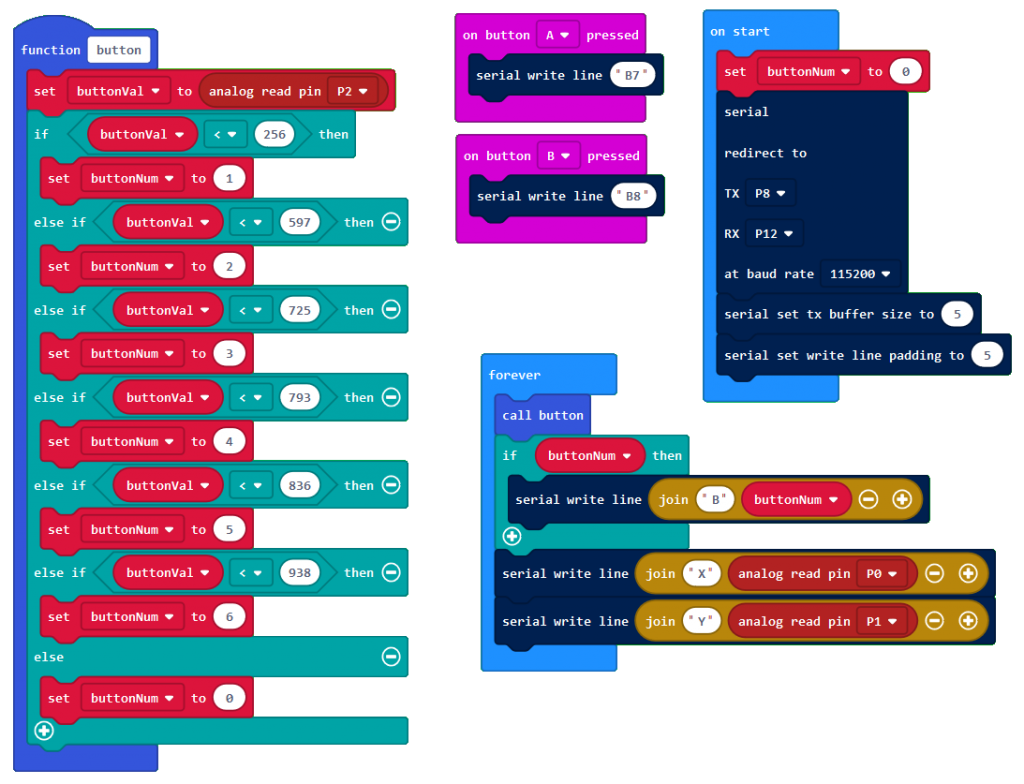
function button () {
    buttonVal = pins.analogReadPin(AnalogPin.P2)
    if (buttonVal < 256) {
        buttonNum = 1
    } else if (buttonVal < 597) {
        buttonNum = 2
    } else if (buttonVal < 725) {
        buttonNum = 3
    } else if (buttonVal < 793) {
        buttonNum = 4
    } else if (buttonVal < 836) {
        buttonNum = 5
    } else if (buttonVal < 938) {
        buttonNum = 6
    } else {
        buttonNum = 0
    }
}
input.onButtonPressed(Button.A, function () {
    serial.writeLine("B7")
})
input.onButtonPressed(Button.B, function () {
    serial.writeLine("B8")
})
let buttonVal = 0
let buttonNum = 0
buttonNum = 0
serial.redirect(
SerialPin.P8,
SerialPin.P12,
BaudRate.BaudRate115200
)
serial.setTxBufferSize(5)
serial.setWriteLinePadding(5)
basic.forever(function () {
    button()
    if (buttonNum) {
        serial.writeLine("B" + buttonNum)
    }
    serial.writeLine("X" + pins.analogReadPin(AnalogPin.P0))
    serial.writeLine("Y" + pins.analogReadPin(AnalogPin.P1))
})
Arduino due code
The Arduino due receives the data from the Micro:bit and translates it to key strokes or mouse movements:
#include "Keyboard.h"
#include "Mouse.h"

int X; // variable used to store the X value for the mouse movement
int Y; // variable used to store the X value for the mouse movement

const int Xmin = 1; // lowest X value from joystick
const int Ymin = 1; // lowest Y value from joystick

const int Xmax = 1018; // highest X value from joystick
const int Ymax = 1021; // highest X value from joystick

const int mouseSpeed = 15;

const int KEY_SPACE = 32;

void setup() {
  Serial.begin(115200);  // start serial for debugging
  Serial2.begin(115200); // start serial to communicate with Micro:bit

  Serial.print("Sketch:   ");   Serial.println(__FILE__);
  Serial.print("Uploaded: ");   Serial.println(__DATE__);
  Serial.println("Verbind de TX2 van de Due met de RX op de Micro:bit");
  Serial.println("Verbind de RX2 van de Due met de TX op de Micro:bit");
  Serial.println("baudrate = 115200");

  // initialize mouse control:
  Mouse.begin();
  Keyboard.begin();
}

void loop() {
  if (Serial2.available()) {
    char bRev = Serial2.read();
    int iVal;
    if (bRev != ' '){  // ignore empty data
      if (bRev == 'X'){
        // X value from joystick received
        iVal = Serial2.parseInt();
        Serial.print("X = ");
        Serial.print(iVal);
        Serial.print(" = ");
        X = map(iVal,Xmin,Xmax,-1 * mouseSpeed,mouseSpeed);
        Serial.println(X);

      }
      else if(bRev == 'Y'){
        // Y value from joystick received
        iVal = Serial2.parseInt();
        Serial.print("Y = ");
        Serial.print(iVal);
        Serial.print(" = ");
        Y = map(iVal,Ymin,Ymax,mouseSpeed,-1 * mouseSpeed);
        Serial.println(Y);
      }
      else if(bRev == 'B') {
        // Button identifier received
        iVal = Serial2.parseInt();
        Serial.print("Button = ");
        Serial.println(iVal);
        switch (iVal) {
          case 1:
            // up button
            Keyboard.press(KEY_UP_ARROW);
            delay(1);
            Keyboard.release(KEY_UP_ARROW);
            break;
          case 2:
            // right button
            Keyboard.press(KEY_RIGHT_ARROW);
            delay(1);
            Keyboard.release(KEY_RIGHT_ARROW);
            break;
          case 3:
            // down button
            Keyboard.press(KEY_DOWN_ARROW);
            delay(1);
            Keyboard.release(KEY_DOWN_ARROW);
            break;
          case 4:
            // left button
            Keyboard.press(KEY_LEFT_ARROW);
            delay(1);
            Keyboard.release(KEY_LEFT_ARROW);
            break;
          case 5:
            // left red button
            Mouse.click(MOUSE_LEFT);
            break;
          case 6:
            // right red button
            Keyboard.write((char) KEY_SPACE);
            break;
          case 7:
            // Micro:bit A button
            Keyboard.write('A');
            break;
          case 8:
            // Micro:bit B button
            Keyboard.write('B');
            break;
          default:
            // statements
            break;
        }
      }
      Mouse.move(X, Y);
    }
  }
  if (Serial.available()) {
    char state = Serial.read();
    Serial2.println(state);
  }
}
When we connect the Arduino due with the native USB port to the PC we can move the mouse cursor using the joystick on the Joystick:bit, use the blue buttons as arrow keys, the red buttons as left mouse button and and space. The A and B buttons on the Micro:bit currently output the letters A and B.
With this as a base we can easily include shaking, A+B button etc…